
Sudoku Solver AR Part 6: Canny Part 1 (Gaussian Blur)
This post is part of a series where I explain how to build an augmented reality Sudoku solver. All of the image processing and computer vision is done from scratch. See the first post for a complete list of topics.
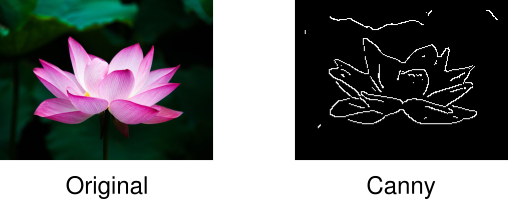
We captured an image from a connected camera (Linux, Windows) and converted it to greyscale. Now to start searching for a puzzle in the image. Since puzzles are made up of a grid of lines, it makes sense that the goal should be to hunt down these straight lines. But how should this be done exactly? It sure would be nice if an image could have all of its shading removed and be left with just a bunch of outlines. Then maybe it would be easier to find straight lines. Enter, the Canny edge detector.
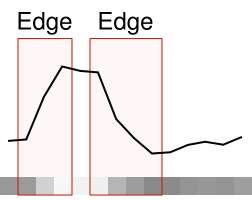
Take a row of pixels from a typical greyscale image and line graph them by intensity. Some sections of the graph will change very little. Other parts will have a much more rapid change indicating an edge in the image. The Canny edge detector is a multi-step algorithm used to find such edges in an image. A particularly nice property of the algorithm is edges are usually reduced to a thickness of a single pixel. It’s very useful considering the thickness of an edge can vary as you move along it.
Gaussian Blur
The first step is to apply a Gaussian filter to the image. Gaussian filters are used for blurring images. They’re very good for suppressing insignificant detail such as the noise introduced by a camera’s capture process.
The Gaussian filter is a convolution based on the Gaussian function (very commonly used in statistics where it describes the normal distribution). Plotting the function produces a bell shaped curve. It’s usually described using the following formula:
`text{Gaussian}(x) = 1/(sigma^2 sqrt(2pi)) * e^(-x^2/(2sigma^2))`
Where x is the distance from the center of the curve and `sigma` is the standard deviation. The standard deviation is used to adjust the width of the bell curve. The constant multiplier at the beginning is used as a normalizing term so the area under the curve is equal to 1. Since we’re only interested in a discrete form of the function that’s going to require normalization (more on this in a moment) anyway, this part can be dropped.
`text{Gaussian}(x) = e^(-x^2/(2sigma^2))`
The standard deviation choice is somewhat arbitrary. A larger standard deviation indicates data points spread out further relative from the mean have more significance. In this case, the mean is the center of the filter where `x = 0` and significance is the contribution to the output pixel. A convenient method is to choose a factor representing how many standard deviations from the mean should be considered significant and relating it to the radius of the filter in pixels.
`r = a*sigma`
`sigma = r/a`
Where `r` is the radius, `sigma` is the standard deviation, and `a` is the number of standard deviations. In the case of image processing, letting `a = 3` is usually sufficient.
A convenient property of the Gaussian filter is it’s a separable filter which means that instead of building a 2D (square) convolution matrix, only a 1D convolution matrix is necessary. Then the convolution is applied in one horizontal pass and one separate vertical pass. Not only does this run faster in practice, but it also simplifies the code.
The first step is to build a kernel by sampling the Gaussian function, defined above, at discrete steps. Then the kernel must be normalized so the sum of each of its values is 1. Normalization is performed by summing all of the values in the kernel and dividing each value by this sum. If the kernel is not normalized, using it in a convolution will make the resulting image either darker or lighter depending on if the sum of the kernel is less than or greater than 1, respectively.
const float radius; //Radius of kernel in pixels. Can be decimal.
const float sigma = radius / 3.0f; //Sigma chosen somewhat arbitrarily.
const unsigned int kernelRadius = static_cast<unsigned int>(radius) + 1; //Actual discrete
                                                                         //sample radius.
                                                                         //The + 1 helps
                                                                         //to account for
                                                                         //the decimal
                                                                         //portion of the
                                                                         //specified
                                                                         //radius.
const unsigned int kernelSize = kernelRadius * 2 + 1; //Number of values in the kernel.
                                                      //Includes left-side, right-side,
                                                      //and center pixel.
std::vector<float> kernel(kernelSize,0.0f); //Final kernel values.

//Having a radius of 0 is equivalent to performing no blur.
if(radius == 0.0f)
    return;

//Compute the Gaussian. Straight from the formula given above.
auto Gaussian = [](const float x,const float sigma) {
    const float x2 = x * x;
    const float sigma2 = sigma * sigma;
    return expf(-x2/(2.0f*sigma2));
};

//Sample Gaussian function in discrete increments. Technically the function is symmetric
//so only the first `kernelRadius + 1` values need to be computed and the rest can be
//found by copying from the first half. But that's more complicated to implement and
//isn't worth the effort.
float sum = 0.0f; //Keep an accumulated sum for normalization.
for(unsigned int x = 0;x < kernelSize;x++)
{
    const float value = Gaussian(static_cast<float>(x) -
                                 static_cast<float>(kernelRadius),sigma);
    kernel[x] = value;

    sum += value;
}

//Normalize kernel values so they sum to 1.
for(float& value : kernel)
{
    value /= sum;
}
Applying the kernel is done by performing a convolution in separate horizontal and vertical passes. I’m choosing to ignore the edges here because they aren’t necessary for this project. If you need them, clamping to the nearest non-out-of-bounds pixels works well.
const std::vector<float> kernel; //Gaussian kernel computed above.
const unsigned int kernelRadius; //Gaussian kernel radius computed above.
const Image inputImage; //Input RGB image.
Image outputImage(inputImage.width,inputImage.height); //Output RGB image. Same width and
                                                       //height as inputImage. Initialized
                                                       //so every pixel is set to (0,0,0).

assert(kernel.size() == kernelRadius * 2 + 1);

//Convenience function for clamping a float to an unsigned 8-bit integer.
auto ClampToU8 = [](const float value)
{
    return static_cast<unsigned char>(std::min(std::max(value,0.0f),255.0f));
};

//Since the input image is not blurred around the border in this implementation, then the
//output would just be a blank image if the image is smaller than this area.
if(kernelRadius * 2 > inputImage.width || kernelRadius * 2 > inputImage.height)
    return outputImage;

//Blur horizontally. Save the output to a temporary buffer because the convolution can't
//be performed in place. This also means the output of the vertical pass can be placed
//directly into the output image.
std::vector<unsigned char> tempImageData(inputImage.data.size()); //Temporary RGB image
                                                                  //data used between
                                                                  //passes.
for(unsigned int y = 0;y < inputImage.height;y++)
{
    for(unsigned int x = kernelRadius;x < inputImage.width - kernelRadius;x++)
    {
        float sum[3] = {0.0f,0.0f,0.0f};
        for(unsigned int w = 0;w < kernel.size();w++)
        {
            const unsigned int inputIndex =
                (y * inputImage.width + x + w - kernelRadius) * 3;
            sum[0] += static_cast<float>(inputImage.data[inputIndex + 0]) * kernel[w];
            sum[1] += static_cast<float>(inputImage.data[inputIndex + 1]) * kernel[w];
            sum[2] += static_cast<float>(inputImage.data[inputIndex + 2]) * kernel[w];
        }

        const unsigned int outputIndex = (y * inputImage.width + x) * 3;
        tempImageData[outputIndex + 0] = ClampToU8(sum[0]);
        tempImageData[outputIndex + 1] = ClampToU8(sum[1]);
        tempImageData[outputIndex + 2] = ClampToU8(sum[2]);
    }
}

//Blur vertically. Notice that the inputIndex for the weights is incremented across the
//y-axis instead of the x-axis.
for(unsigned int y = kernelRadius;y < inputImage.height - kernelRadius;y++)
{
    for(unsigned int x = kernelRadius;x < inputImage.width - kernelRadius;x++)
    {
        float sum[3] = {0.0f,0.0f,0.0f};
        for(unsigned int w = 0;w < kernel.size();w++)
        {
            const unsigned int inputIndex =
                ((y + w - kernelRadius) * inputImage.width + x) * 3;
            sum[0] += static_cast<float>(tempImageData[inputIndex + 0]) * kernel[w];
            sum[1] += static_cast<float>(tempImageData[inputIndex + 1]) * kernel[w];
            sum[2] += static_cast<float>(tempImageData[inputIndex + 2]) * kernel[w];
        }

        const unsigned int outputIndex = (y * inputImage.width + x) * 3;
        outputImage.data[outputIndex + 0] = ClampToU8(sum[0]);
        outputImage.data[outputIndex + 1] = ClampToU8(sum[1]);
        outputImage.data[outputIndex + 2] = ClampToU8(sum[2]);
    }
}
While the Canny edge detector described here going forward expects a greyscale image, the Gaussian filter works well on RGB or most other image formats. Next time I’ll cover the next step of the Canny edge detector which involves analyzing how the intensity and direction of pixels change throughout an image.